 |
| Worn toe slider and boot sole |
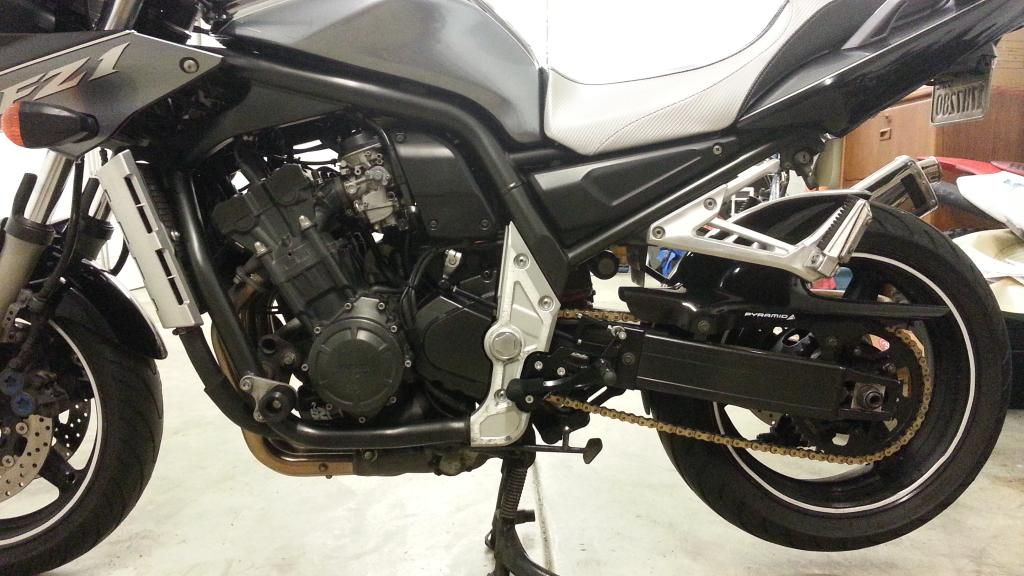
I scraped my boots throughout the rest of that day. More than I ever have. It was partly due to the sticky sport tire and partly due to my inactivity. Cruzman and iluvmyfz1 both have aftermarket rearsets. Besides suggesting the cliche "get off the seat more", they both mentioned the comfort and better feel with their rearsets. During the rally, I got a chance to try Cruzman's for about three miles. I liked the look and the idea of having my feet a little farther back but I can't say they left a huge impression.
On the way home from the rally (or a ride) I had my foot snatched from the peg by the ground for the first time. That's not something I want to happen often and I resolved to get off the seat a little more to avoid it in the future. Months of not riding left that resolve with the other memories that don't come back unless prompted by something. That prompt was in the first real curve of the January ride when my foot came away from the peg again.
Suddenly I remembered the conversations Cruzman and I had about why he decided to get rearsets. Naturally, I liked the way they looked but he had very good reasons that included scraping his peg feelers. I changed my footpegs long before I could get to point of scraping feelers so I never got the pleasure of that sensation, instead I skipped straight to scraping boots mainly in tight curves. He said he really noticed it after upgrading his rear suspension, scraping the pegs on both sides even in mildly tight curves. The added benefit was better shifting and more comfortable leg position.
 |
| Danmoto Gen 2 Rearsets |
maybe rearsets could be a solution to dragging hard parts. The options for aftermarket rearsets for a 10+ year old motorcycle are limited. There are two manufacturers currently making rearsets specifically for the gen 1 in the sub $300 delivered price point: Valter Moto and Danmoto; both hit the market about the same time. Valter Moto Type 1 rearsets are bolt on replacements but not adjustable while Danmoto 2nd generation rearsets are mostly bolt on with minor modifications and adjustable. There are more expensive alternatives but these are the two I made my choice from because the others are priced in fantasy land along with the beautiful lightweight rims.
As always, I recommend pjsparts for the Valter Moto; danmoto.com for the Danmoto (they're also
 |
| Valter Moto Type 1 Rearsets |
 |
| FZ1OA member Nixinus Valter Moto rearsets |
They arrived about a week later with only a slight delay because of the weather. I studied Cruzman's writeup and pestered him with questions until I decided to just do it myself. Danmoto's customer support was also very helpful and answered emails quickly.
The rearsets come pre-assembled with a bunch of legalese and extremely basic instructions: remove the old ones, put the new ones on, use loctite, and let a professional do it. You only need a set of allen wrenches (mainly size 4 and 5), 10 and 12 mm wrenches, a lot of blue loctite.
 |
| What's in the box? |
 |
 |
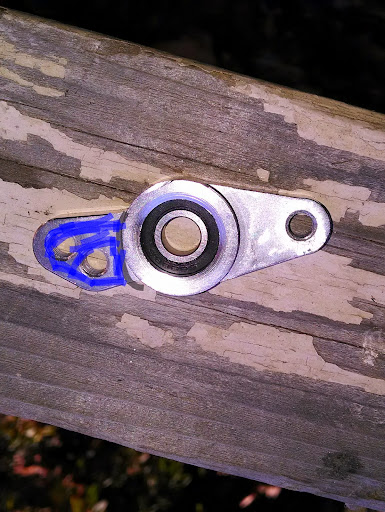
First step is to switch the female rod end to the other side from they way it's shipped. If you don't it will bind.

Based off my conversations with Cruzman, after the rearsets arrived I took them to Home Depot and got M5 screws for the clutch side heel plate (not included but should be) and four nylon spacers.
 |
| Location of some of the nylon spacers. I haven't used the #2 washer. |

Thanks to Cruzman, I knew there'd be minor issues.
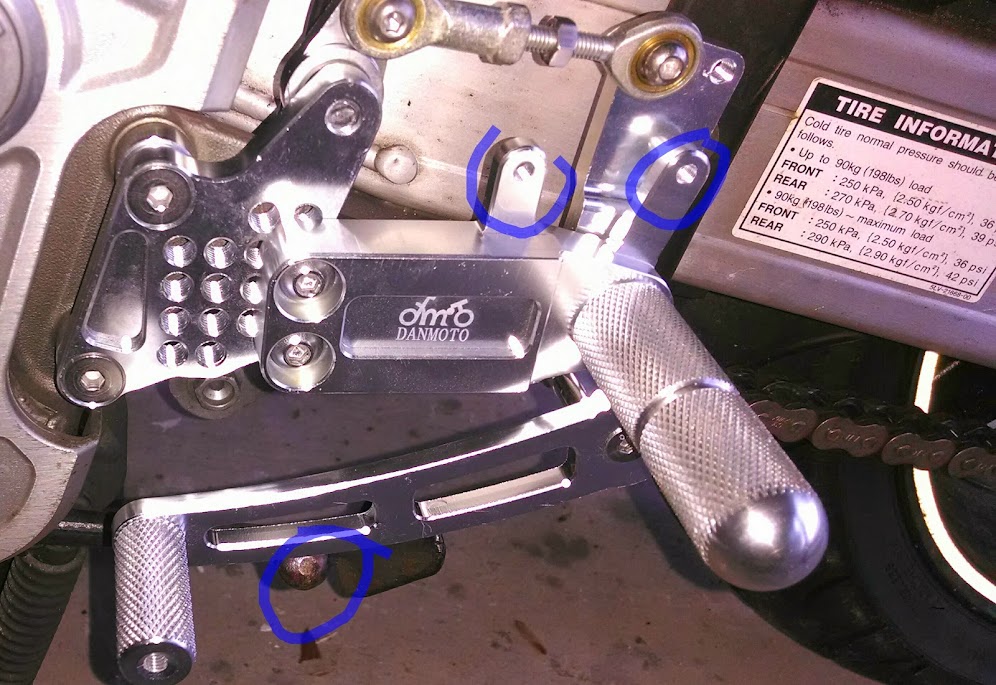 |
| Some of the minor issues marked in blue. Plus the female rod end should be switched to the other side. |
 |
| The part to the right with the two holes needs to be removed to avoid binding against the frame. |
 |
| GP Shift part binds against the frame. |
 |
| Part of the shift selector that hits the frame colored in blue. |
 |
 |
For once it wasn't a day long ordeal at the expense of multiple cutting discs and the alienation of my dawgs. Thanks to a coupon, I have a high speed air cut-off tool. Tidied up and ready for install.

According to the Danmoto tech, the additional spacers aren't needed because the aluminum one works fine. Possibly but it seemed kind of weak to me (plus I dropped it and it's now lost), so I replaced it with a longer nylon one that put a little space between the bearing and shift selector along with the requisite loctite on the bolt.

I had to change my R1 shifter arm back to OEM because the shift rod doesn't clear the frame and I didn't want to modify it. One reason for the R1 shifter arm is to have crisper shifts. Aftermarket rearsets are supposed to do the same thing so my R1 arm would be redundant. With that done it was just a matter of putting the rod ends so the angle of the shift selector could be adjusted by turning the shift rod.
 |
| OEM Shifter Arm re-installed. Next I adjusted the rod ends to add adjustability. |
 |
| Nylon spacer first on one side then the other. Also note female rod end relocated to pedal plate. |

Next day, I got out the heater and finished the brake side. I learned that the brake light switch has an adjustment so after time wasted messing with the spring I finally got it adjusted so it fit with the brake light off until the pedal was pressed.
 |
| I never knew the brake light switch was adjustable too. |

Looked great but now the pedal was sticking when I pressed it. I remembered reading something about it while I was waiting for the rearsets to arrive. I don't remember Cruzman mentioning much about the brake side except that something wiggled a little. That's the plate that holds the brake switch. It is secured with a tiny screw on one side and the top adjustment bolt. On the Superhawk forum, some chose to drill though the body and add a larger bolt with nylock nut.
 |
| Danmoto gen 2 rearsets installed on a Honda Superhawk. Same basic design. |

Time to adjust the clutch side so that it did more than drop into first gear sometimes. Important note: try to keep the shift selector as close to 90 degrees as possible. Danmoto makes that more challenging than it should be by including a shift rod that is slightly too long. Another important note: get the selector adjusted first then worry about the height of the shifter.
The clutch rearset has three adjustment points: Shift selector, pedal height, and peg location. It took me a few minutes to realize why I couldn't get the selector to 90 degrees. I was trying to make the adjustment the way I always did.
While I was getting the clutch side adjusted, that flexing screw worried me so I decided I'd get a shorter one when I went to get more JB Weld so I can adjust the angle of the kick on my side stand. I was pleased with the way the rearsets felt just sitting in the garage going through the gears and desperate to get out for some kind of test ride.
Weather delayed it for a couple of days so I used the time to change the oil and to figure out how I'd fix the other minor issues like center stand hitting the shift pedal.

After searching through my tool box, I found spares from some piece of furniture and added an extension to the stop.

The other issue is interference with the side stand.
 |
| Cruzman's solution? Cut it off and relocate it. |
 |
| My modified adjustable stand puts the "kick" near the toe peg. It will get relocated. |
On my short test ride however I noticed everything. I didn't put mine as far back as Cruzman did. For now they are just a little farther back than stock. The shifting is very crisp, even better than the R1 shift arm (just not as cheap). Other owners mention feeling more vibration when switching from the weighted stock pegs. There's probably less vibration than with the "racing pegs" that I had on it before.
Getting through all the gears seemed so much smoother than ever before. I didn't even feel the flexing in that screw that I'd seen all the while I was adjusting it. I took the long way to the store with only the clutch peg and therefore the shifter being loose when I got there. That was pretty good considering how many times I took it on and off also easily fixed with the allen wrenches I keep in my tank bag.
For peace of mind, I replaced the flexy danmoto bolt and added nylon spacer with a shorter bolt that felt a lot stronger.
 |
 |
I can not believe how great Baby felt and looks with the new rearsets. I'm hoping for an overnight test in the next few weeks!


Thanks for reading!
patrice, theWolfTamer
 |
| I initially blacked out the danmoto logo with a black sharpie but it came off while I was cleaning the bike. |
 |
| I think I like them better with the logo showing. |
No comments:
Post a Comment