When I started adding electrical stuff to the bike, I never imagined I'd end up with so much stuff. At first it was simply the alarm and the accessory outlet. By the time I got around to the aux lighting, I had a mess under my seat. I searched for a way to clean it up using a budget conscious approach since I am broke!
The rat's nest:

Canyon Chasers has a very good write up to do just this but being me, I wanted a little more. I had farkles that only work when the bike is switched on and others that I want available even when the bike is off.
To meet my needs, I modified what they did. I started with one of these relay and fuse holder
First thing to do is connect the wires to the relay. I chose a 4 prong automotive relay

The wiring is as follows:
Relay on the left,
87 - Fat yellow wire to the inline fuse and positive on the battery
85 - Top black wire to neg on battery
86 - Bottom black wire to switched source of bike -- I use the brake lights.
30 - 3 red wires to the fuses
Fuses on the right,
Fuse 1 black wire goes to my aux lights
Fuse 2 red wire goes to my grip heaters
Fuse 3 waiting for me to install something else I want switched.
This takes care of the switched farkles,

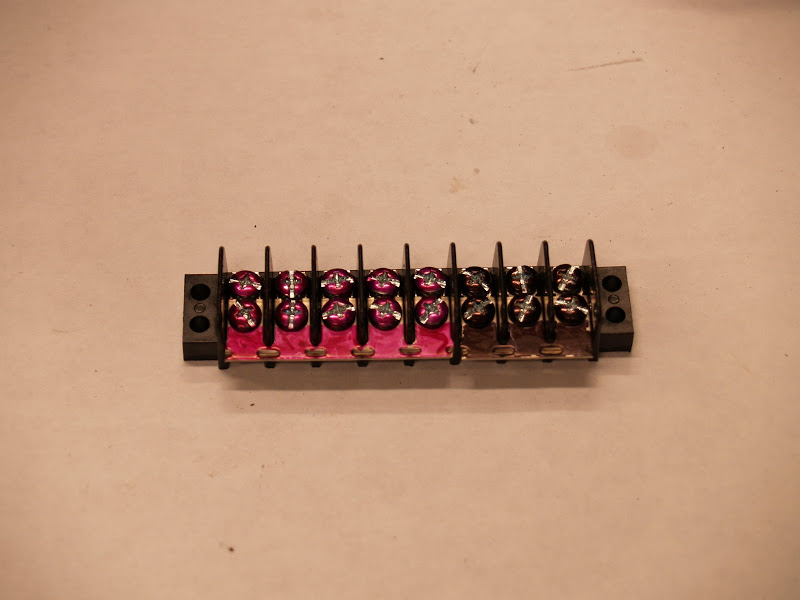
so what about unswitched? First, all of my unswitched items have an inline fuses. I got a barrier strip and position jumper from radio shack like suggested on the Canyon Chasers site.

This is how these work: the jumpers make polarity. When you slide your jumper onto the strip, it connects the screws around it. In the picture below, the + ones are colored red, and ground is colored black. All the screws in the red part of the block are positive, in this case that gives you 9 options, with the remaining one going to the battery.
It took me forever to figure that out! I've had my barrier strip and jumper since I added the Aux Lights just waiting for me to understand that concept. I wish I'd seen that picture sooner because it was really a pain in the ass trying to figure that out. Why? Because I couldn't picture simple wiring principles.
Detailed explanation that you can skip if you don't care:
What ever power source you connect at one screw on the strip, will be available to the bottom screw. The jumper strip allows you to make a set of screws the same thing. For this purpose, a set for positive with a wire on one screw going to the positive battery terminal and a set for ground with a wire on one screw of the set going to the negative battery terminal.
Here's a pic to help you understand:
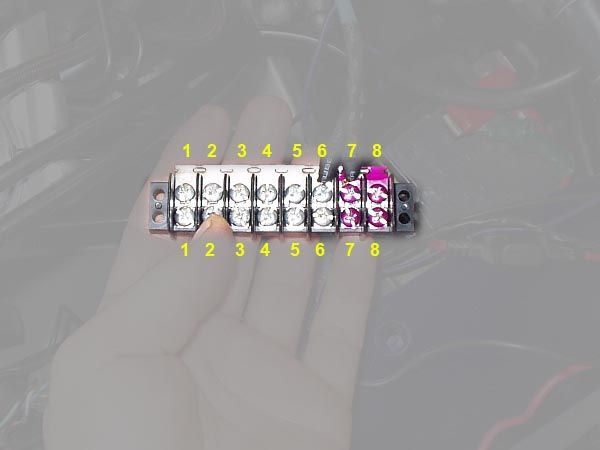
(stole that too, from fjrforum!)
Without the jumper, 1 and 1 are always connected, 2 and 2, and so on. With the jumper, 1 to 6 are all ground and 7 & 8 are positive. The wire on 6 goes to the negative battery terminal, 7 goes to positive--either from the relay or directly to the battery. These things give you all kinds of possibilities. For example, instead of using the relay/fuse holder, I could have used a jumpers and made a "set" for switched, another for unswitched, and another for ground.
Of course, you can also use two barrier strips to accomplish the same thing. If you use two, you don't need to cut the jumper. One strip will be + and the other -. Like this:

The little zigzags indicate the jumper connecting the terminals.
Make sure you know where you want to put it before you start cutting wires. You need to be sure your wires will fit the final placement. I chose to hide mine under the left side frame cover.
So, I chose the first way, using one 6 position strip. First thing is cut the jumper so you can configure your "distribution" block the way you want to, I used 5 for + and 5 for -. When you cut the jumper, make sure the two new pieces don't touch. Next, run a wire for the + and - terminals on the battery. After that, just add the wires to your stuff. I left the relay connected directly to the battery.
(yep, borrowed that too. I didn't take any pics of this process.)
Now, instead of a wire for the lights (headlight and aux lights), alarm, accessory outlet, grip heaters, battery charger pigtail, and something else I can't remember all going to the positive terminal on the battery, I have the neat solution with the fuse/relay holder and the distribution block neatly hidden away.

Only three wires to the individual terminals now: one for the fuse/relay holder, one for the distribution block, and one for the battery charger pigtail. If you're worried about weather affecting your distribution block, you can spray or wrap it in electrical tape.
If you have deep pockets, there are several commercial options around, like the FZ-1 by Fuzeblock, PC-8 from Eastern Beaver, or the AP-2 by Centech to name a few. I spent about $16 for my setup: $5 for the relay/fuse holder, $3 for the barrier strip, $2 for the position jumper, and $6 for the relay.
Thanks for reading,
patrice, theWolfTamer
No comments:
Post a Comment